Monday, 3 October 2016

Configuring Forms Based Authentication in SharePoint 2016 – Part 2 – Creating the Membership Database

This article will help you out on Configuring Forms based authentication (FBA) in SharePoint 2016 it is very similar to SharePoint 2013.

I have broken down steps in  4 articles.

1. Configuring SharePoint

2. Creating Membership Database

3. Adding users to Membership Database

4. Editing the web.config files.

 So lets get started :)

Part 2 – Creating the Membership Database


 When we configure FBA for SharePoint we need a place to store all our usernames and passwords.
ASP.Net comes with a tool which we can use to create a membership database to store logon information.

Steps to create membership database.

  • Navigate to "C:\Windows\Microsoft.NET\Framework64\v4.0.30319"
  • Run application "aspnet_regsql.exe"
  •  Welcome screen will appear.Click Next
  •  Select “Configure SQL Server for application services” option and click Next.


  •  Enter the name of your server and your authentication information.I have selected windows authentication as i have single server farm.My administrator account has full access over SQL Server.Click Next

  •  Confirm your settings and click Next
  • The database has been created. Click finish.
     

    • Now we have to add the Application Pool that runs the web application and give it required permission . I have used Sutta\Administrator as my application pool name. 
    • Open up SQL Management Studio, Expand the database we created and expand Security
    • Right click Users and add a new User
    • User Type = Windows User
    • User name = choose <yourAppPoolAccountName>
    • Login name = browse and choose the login name


    •  Now Click on Owned Schemas and choose the following.
      • aspnet_Membership_FullAccess
      • aspnet_Persolalization_FullAccess
      • aspnet_Profile_FullAccess
      • aspnet_Roles_FullAccess
      • aspnet_WebEvent_FullAccess


    We are done with Part-2.Now, we will move to part 3 which is "Adding users to Membership Database".

    Happy SharePointing :)

Configuring Forms Based Authentication in SharePoint 2016 - Part 1 Configuring SharePoint


This article will help you out on Configuring Forms based authentication (FBA) in SharePoint 2016 it is very similar to SharePoint 2013.

I have broken down steps in  4 articles.

1. Configuring SharePoint

2. Creating Membership Database

3. Adding users to Membership Database

4. Editing the web.config files.

 So lets get started :)

Part 1-  Configuring SharePoint


  • Open SharePoint Central Administration -> Application Management -> Manage Web Applications.
  • Click “New” to create a new Web Application.
  • Name the Web Application and change options to your preferences.
  •  Check "Enable Forms Based Authentication"and enter the Asp.net MemberShip Provider Name and Asp.net Role Provider name.As an Example i have used FBAMember and FBARole. Click OK
  •  Once Web Application is created we will create root site collection for it.


  • While creating the root site collection, you can choose any template or URL.
  • Now if you browse the site collection it will take you to default sign in page where you will be asked to choose an Authentication Provider to Sign In.If you want external users than FBA is the only option.


 We are done with SharePoint Configuration.
In next part we will cover Creating Membership Database.

Happy SharePointing :)

Wednesday, 28 September 2016

Creating UDL to test the Connection between SharePoint and SQL.


This post will guide on how to create and test the connectivity between SharePoint and SQL.

So lets get started :)

Sometimes while working on SharePoint we may encountered issue like

"A Network- related or instance occurred while establishing a connection to SQL server"
"The server was not found or was not accessible".

So UDL is the best way to test whether our SharePoint is able to communicate with SQL or not

Below are the steps to create the UDL:

1. Right click on the desktop and Go to New > Text Document


2. Now open the Text Document and Click on Save As. Give a name with UDL extension for example Test.UDL and Select All files in Save as type.


3. You text document will look like this now

4. Now we will check the connection between SharePoint and SQL. Open the UDL file.


5. Enter the SQL server name and Select window or specific username (they should have access to login to SQL) and Click on Test Connection


6. If communication is happening you will get result "Test connection succeeded". Otherwise it will fail.

Hope this article helped you out.

Happy SharePoinring :)


Monday, 26 September 2016

PowerShell to disable and enable the Sync option in SharePoint

This post is related to Power-shell cmd to disable and enable the Sync option in SharePoint

So lets get started :)

Our Sync option is working fine.


If you are using window Power-Shell then you have to add Power-Shell snap-ins for  SharePoint.

I ran these cmds on SharePoint management Shell
 
To disbale the Sync option  (ExcludeFromOfflineClient=1)

Get-SPSite -limit all | get-SPWeb -limit all | Foreach { $_.ExcludeFromOfflineClient=1;
$_.Update()}


After successfully completion of commands our sync option has been disable.


Now, we have to enable the Sync option again.
To enable the Sync option  (ExcludeFromOfflineClient=0)

Get-SPSite -limit all | get-SPWeb -limit all | Foreach { $_.ExcludeFromOfflineClient=0;
$_.Update()}


After successfully completion of commands our sync option is enable again.


Happy SharePointing :)

How to Disable the Sync option in Sharepoint 2016


Sync option enable users to keep copies in sync between SharePoint libraries and User's local disk.

Lets get started :)

We have to disable the sync option which can see on site collection level or at document libraries.


Steps to disable sync option:

1. Go to Site Settings.


2. Click on "Search and offline availability" under Search


3. Select no for offline Client Availability and click OK


4.  The Sync option has been disabled.


Happy  SharePointing :)


Friday, 23 September 2016

Unable to see the recent uploaded document in SharePoint Document library


Many users faces this issue.

They upload the document but unable to see it in document library. No need to worry in this case.

You just missed one step which was to check in the file.

Please follow the below steps to resolve it.

1. Open the document lib.

2. Click on Document library settings.


3. Now click on "Manage File which have no checked in version".


4.You can see your documents there, select the document and click on "Take Ownership of Selection".

5.Come back to your document library and Check-in the document.

Issue Resolved

Happy SharePointing :)

Adding Microsoft Project .mpp files into Search


This post will help you out with searching .mpp (Microsoft project) file in SharePoint.

So lets get started :)

1. First of all we have to add .mpp extension to our search service application file types.

2. Go to Search Service Application manage page > Click on File types.


3. Click on New File Type. Enter extension .mpp and click OK


4. mpp extension has been added to file types


5. Most important part you have to do an index reset and then full crawl of local SharePoint sites .

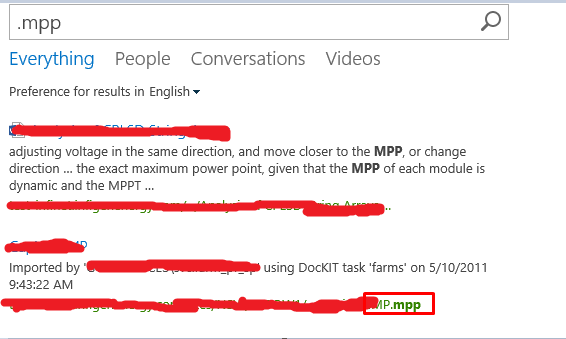
6.Once after the completion of Crawling. You can try to search for .mpp file in your sites

Below are the search result for Microsoft project file (.mpp)


Happy SharePointing :)